> ## Documentation Index
> Fetch the complete documentation index at: https://docs.eykdata.com/llms.txt
> Use this file to discover all available pages before exploring further.

# Google Ads conversion destination

> Conversion tracking

The Google Ads conversion destination in Eyk sends server-side event data to Google Ads, and can be used to optimise campaigns.

## Setup instructions

<Steps>
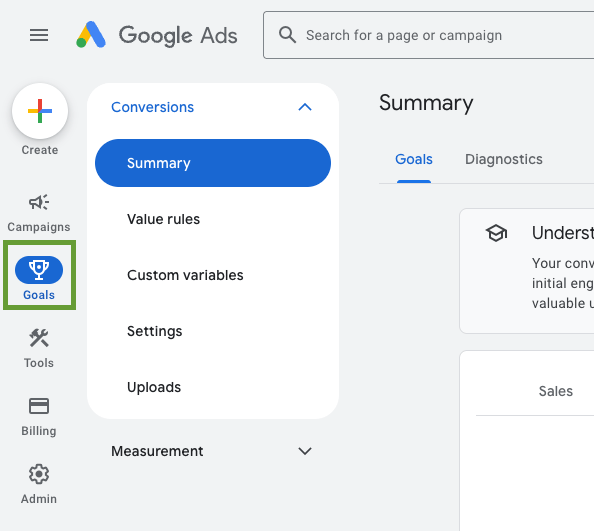
  <Step title="Open Goals">
    Go to your Google Ads account and click on **Goals** in the left-side menu.
    <Frame>
      <img src="https://mintcdn.com/eyk-data/003HpFVjXCLV8bE-/images/destinations/google-ads/01-goals-menu.png?fit=max&auto=format&n=003HpFVjXCLV8bE-&q=85&s=8679fa17ddfba780b63905ec8907397e" alt="Goals menu in Google Ads" width="594" height="531" data-path="images/destinations/google-ads/01-goals-menu.png" />
    </Frame>
  </Step>

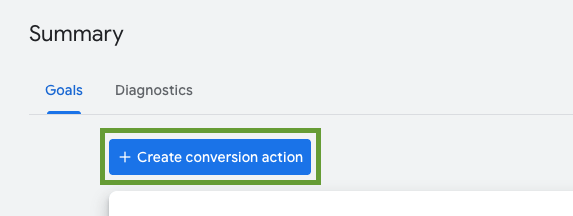
  <Step title="Create a conversion action">
    Scroll down and click on the button **+ Create conversion action**.
    <Frame>
      <img src="https://mintcdn.com/eyk-data/003HpFVjXCLV8bE-/images/destinations/google-ads/02-create-conversion-action.png?fit=max&auto=format&n=003HpFVjXCLV8bE-&q=85&s=6c8466b05d694e8ecae342b0d69de7c4" alt="Create conversion action button" width="573" height="216" data-path="images/destinations/google-ads/02-create-conversion-action.png" />
    </Frame>
  </Step>

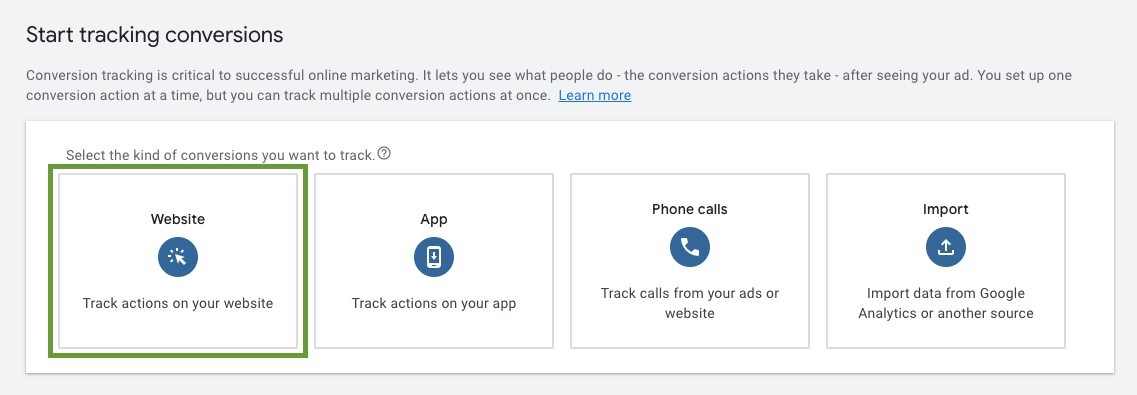
  <Step title="Select Website">
    On the next page, select **Website**.

    <Frame>
      <img src="https://mintcdn.com/eyk-data/003HpFVjXCLV8bE-/images/destinations/google-ads/03-select-website.png?fit=max&auto=format&n=003HpFVjXCLV8bE-&q=85&s=db0fabe3638db256a3f27e29a60690d0" alt="Select Website as conversion source" width="1137" height="395" data-path="images/destinations/google-ads/03-select-website.png" />
    </Frame>
  </Step>

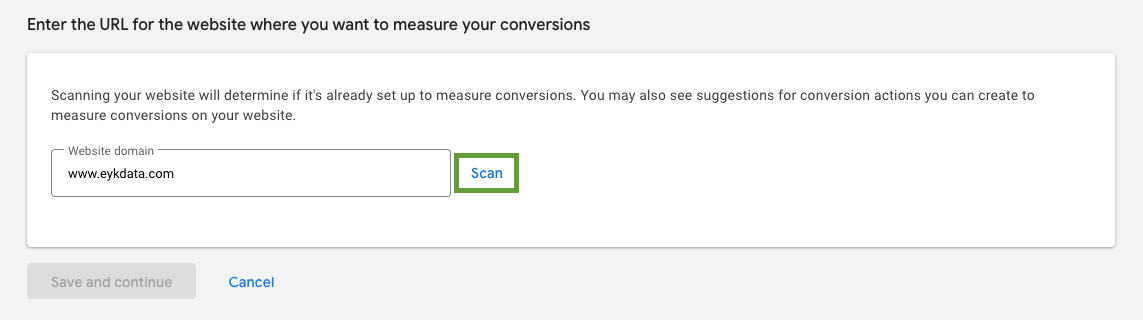
  <Step title="Scan your domain">
    Enter your website domain and click **Scan**.
    <Frame>
      <img src="https://mintcdn.com/eyk-data/003HpFVjXCLV8bE-/images/destinations/google-ads/04-scan-domain.png?fit=max&auto=format&n=003HpFVjXCLV8bE-&q=85&s=c6031158f26633624d55a5bb1508b956" alt="Scan website domain" width="1143" height="320" data-path="images/destinations/google-ads/04-scan-domain.png" />
    </Frame>
  </Step>

  <Step title="Use Google Ads only">
    In case you see the following note, click **Use Google Ads only**. If you don't see this, please skip this step.

    <Frame>
      <img src="https://mintcdn.com/eyk-data/003HpFVjXCLV8bE-/images/destinations/google-ads/05-use-google-ads-only.png?fit=max&auto=format&n=003HpFVjXCLV8bE-&q=85&s=0d42ed0e69d9ce455a2bd66b562709fb" alt="Use Google Ads only option" width="1129" height="105" data-path="images/destinations/google-ads/05-use-google-ads-only.png" />
    </Frame>
  </Step>

  <Step title="Add a conversion action manually">
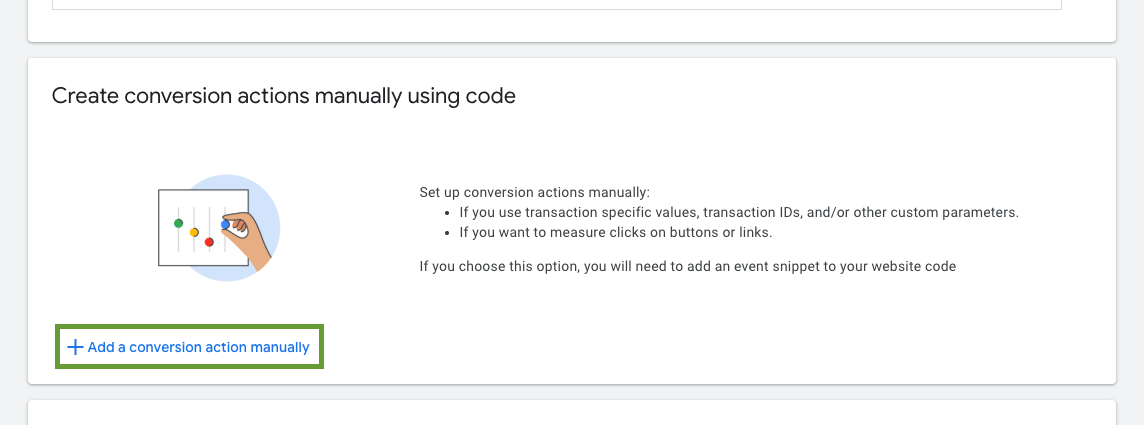
    Scroll down to the section **Create conversion actions manually using code** and click **+ Add a conversion action manually**.
    <Frame>
      <img src="https://mintcdn.com/eyk-data/003HpFVjXCLV8bE-/images/destinations/google-ads/06-add-conversion-action-manually.png?fit=max&auto=format&n=003HpFVjXCLV8bE-&q=85&s=a84c24e758999f83a6b9010a3055568c" alt="Add a conversion action manually" width="1144" height="425" data-path="images/destinations/google-ads/06-add-conversion-action-manually.png" />
    </Frame>
  </Step>

  <Step title="Select the Purchase category">
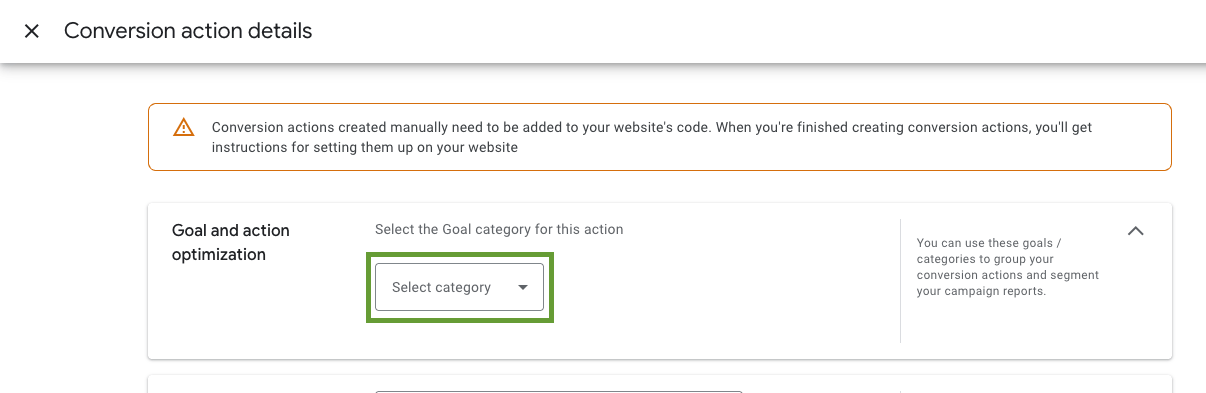
    On the next page, click on the **Select category** drop down and select **Purchase**.
    <Frame>
      <img src="https://mintcdn.com/eyk-data/003HpFVjXCLV8bE-/images/destinations/google-ads/07-select-purchase-category.png?fit=max&auto=format&n=003HpFVjXCLV8bE-&q=85&s=ee880f3bae8a890ef00842a7596a63ca" alt="Select Purchase category" width="1206" height="393" data-path="images/destinations/google-ads/07-select-purchase-category.png" />
    </Frame>
  </Step>

  <Step title="Set the action as secondary">
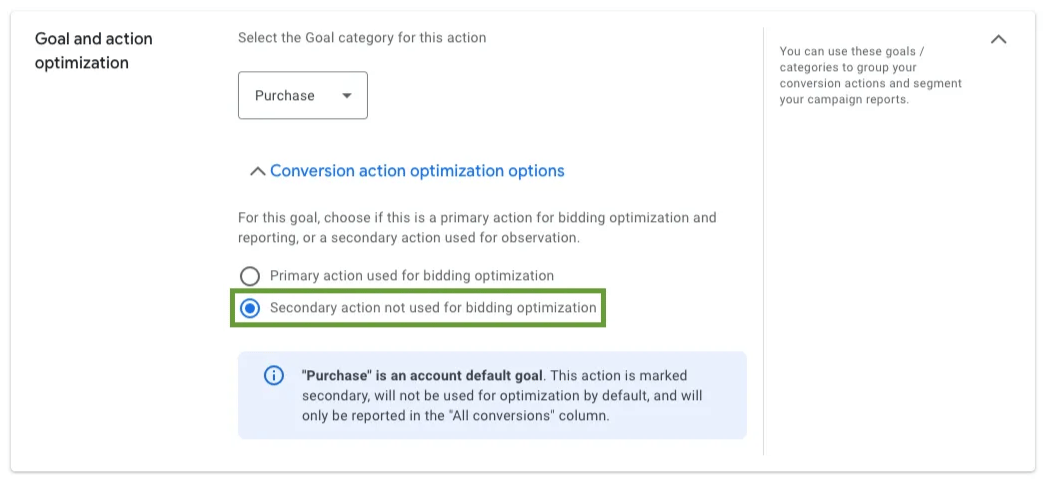
    Then click on **Conversion action optimization options** to expand and select **Secondary action not used for bidding optimization**.

    <Info>
      We initially run the conversion actions in secondary mode because conversion actions in Google Ads require a certain volume of data to optimize performance effectively. By keeping your existing conversion action as the primary one and running it alongside Eyk for approximately two weeks, you can ensure a seamless transition.
    </Info>

    <Frame>
      <img src="https://mintcdn.com/eyk-data/003HpFVjXCLV8bE-/images/destinations/google-ads/08-secondary-action.png?fit=max&auto=format&n=003HpFVjXCLV8bE-&q=85&s=510e43ff1668f273fba97a502964a24b" alt="Secondary action optimization option" width="1045" height="484" data-path="images/destinations/google-ads/08-secondary-action.png" />
    </Frame>
  </Step>

  <Step title="Name the conversion">
    For **Conversion name** enter `Purchase (Eyk)`.

    <Frame>
      <img src="https://mintcdn.com/eyk-data/003HpFVjXCLV8bE-/images/destinations/google-ads/09-conversion-name.png?fit=max&auto=format&n=003HpFVjXCLV8bE-&q=85&s=4e86f071c3c511f0708486cdd075d692" alt="Conversion name field" width="1049" height="152" data-path="images/destinations/google-ads/09-conversion-name.png" />
    </Frame>
  </Step>

  <Step title="Keep default value and count settings">
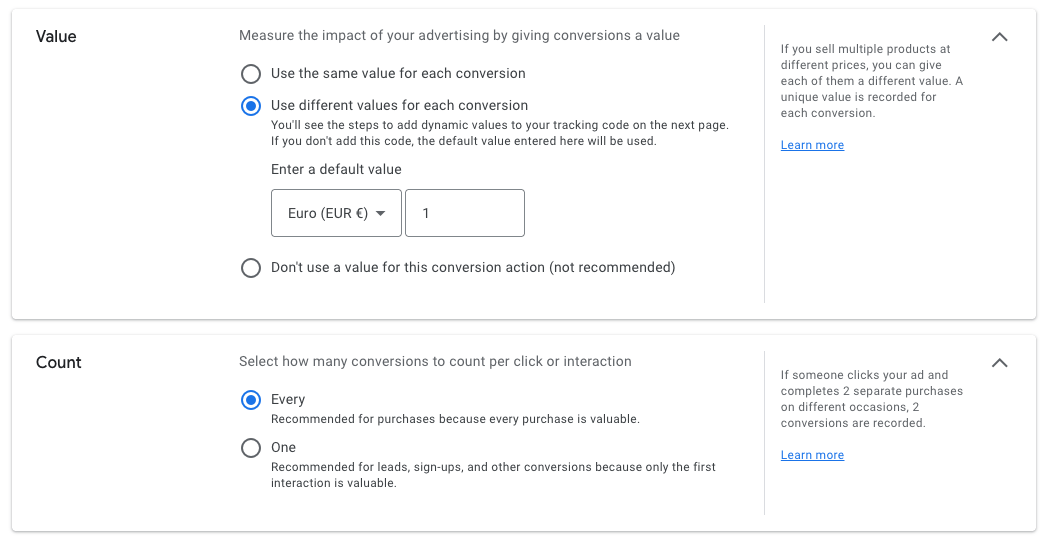
    Keep the default settings in the **Value** and **Count** section. Under **Value**, the option **Use different values for each conversion** should be selected. Under **Count**, ensure **Every** is selected.
    <Frame>
      <img src="https://mintcdn.com/eyk-data/003HpFVjXCLV8bE-/images/destinations/google-ads/10-value-count-settings.png?fit=max&auto=format&n=003HpFVjXCLV8bE-&q=85&s=dd8808306bdcc416b7e88e39391ad19a" alt="Value and count settings" width="1048" height="544" data-path="images/destinations/google-ads/10-value-count-settings.png" />
    </Frame>
  </Step>

  <Step title="Enable enhanced conversions">
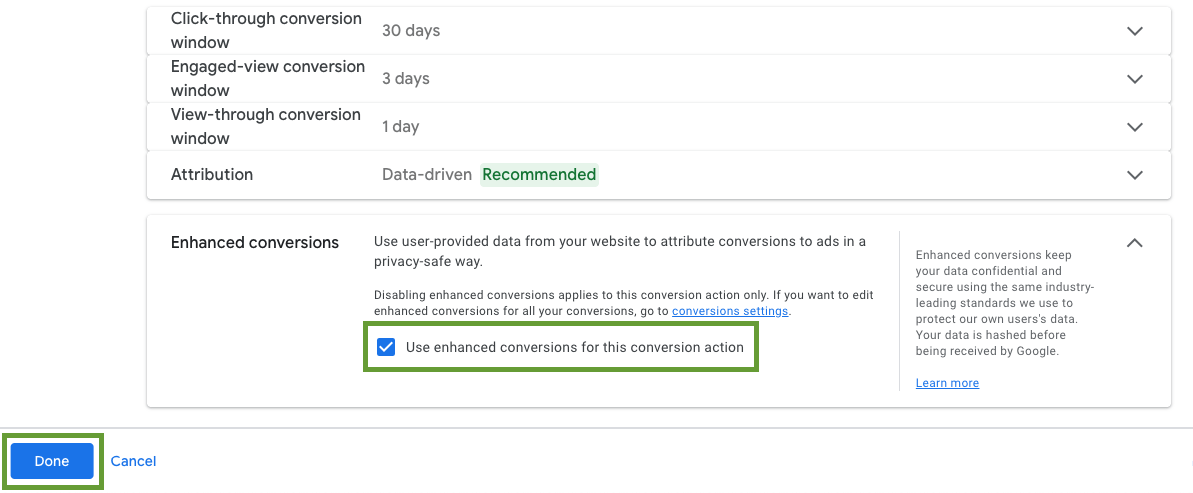
    Under the **Enhanced conversions** section, ensure **Use enhanced conversions for this conversion action** is selected. Then click the **Done** button in the bottom left corner.
    <Frame>
      <img src="https://mintcdn.com/eyk-data/003HpFVjXCLV8bE-/images/destinations/google-ads/11-enhanced-conversions.png?fit=max&auto=format&n=003HpFVjXCLV8bE-&q=85&s=1e717e6b47c15c4a76cb63e20d786a4b" alt="Enhanced conversions setting" width="1193" height="493" data-path="images/destinations/google-ads/11-enhanced-conversions.png" />
    </Frame>
  </Step>

  <Step title="Repeat for the other conversion actions">
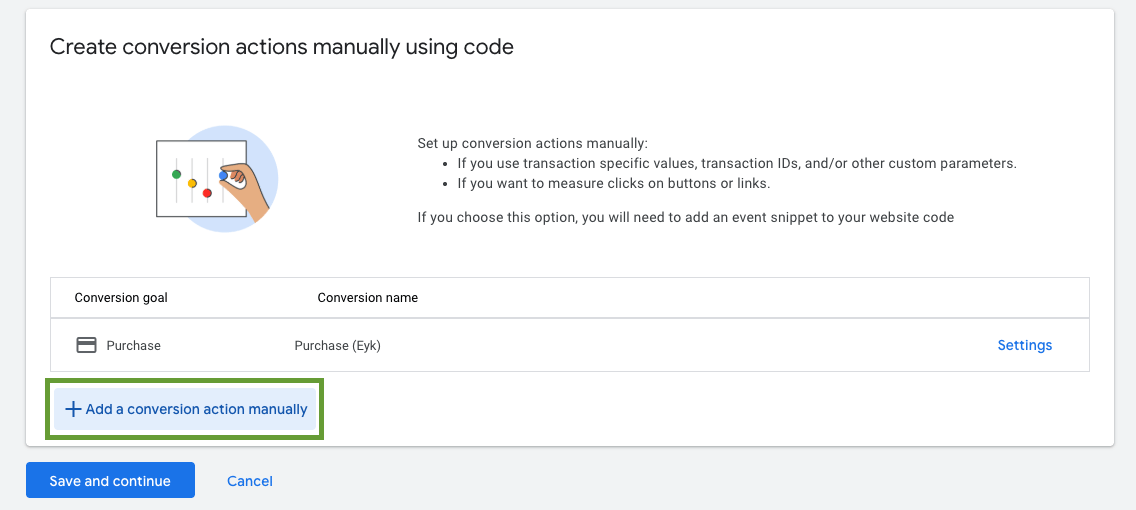
    Click **+ Add a conversion action manually** and repeat steps 6 to 10 for goal categories **Add to cart** and **Begin checkout**.
    <Frame>
      <img src="https://mintcdn.com/eyk-data/003HpFVjXCLV8bE-/images/destinations/google-ads/12-add-another-conversion-action.png?fit=max&auto=format&n=003HpFVjXCLV8bE-&q=85&s=754de9f8fcb05bc108149b9cf9933937" alt="Add another conversion action" width="1136" height="510" data-path="images/destinations/google-ads/12-add-another-conversion-action.png" />
    </Frame>
  </Step>

  <Step title="Save and continue">
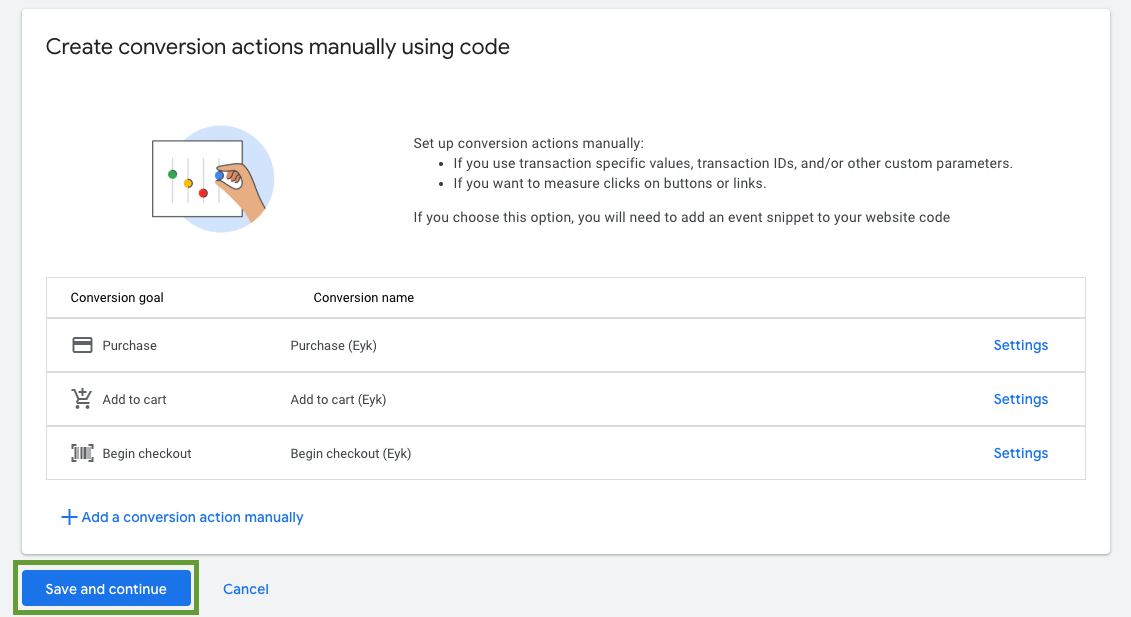
    When **Purchase**, **Add to cart** and **Begin checkout** are all added, select **Save and continue**.
    <Frame>
      <img src="https://mintcdn.com/eyk-data/003HpFVjXCLV8bE-/images/destinations/google-ads/13-save-and-continue.png?fit=max&auto=format&n=003HpFVjXCLV8bE-&q=85&s=51586e4006eb8c0fb31d56300f30c29f" alt="Save and continue button" width="1131" height="617" data-path="images/destinations/google-ads/13-save-and-continue.png" />
    </Frame>
  </Step>

  <Step title="Use Google Tag Manager">
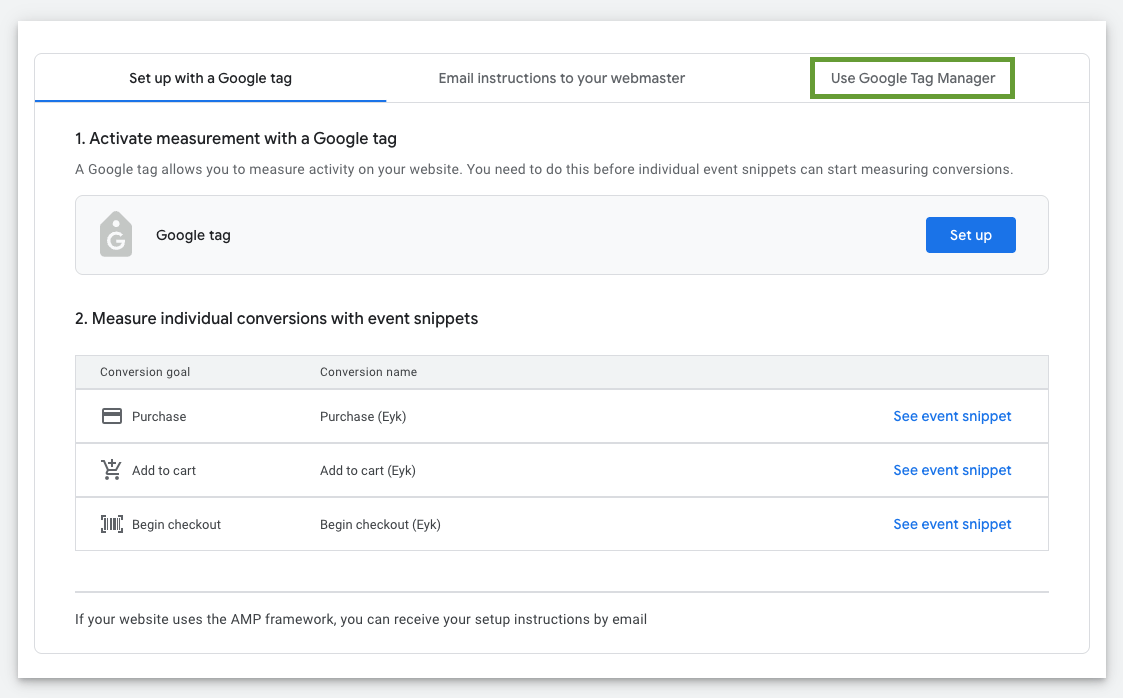
    On the next page, select **Use Google Tag Manager**.
    <Frame>
      <img src="https://mintcdn.com/eyk-data/003HpFVjXCLV8bE-/images/destinations/google-ads/14-use-google-tag-manager.png?fit=max&auto=format&n=003HpFVjXCLV8bE-&q=85&s=ad28e0e10f3144dad55f7f50237cb132" alt="Use Google Tag Manager option" width="1123" height="698" data-path="images/destinations/google-ads/14-use-google-tag-manager.png" />
    </Frame>
  </Step>

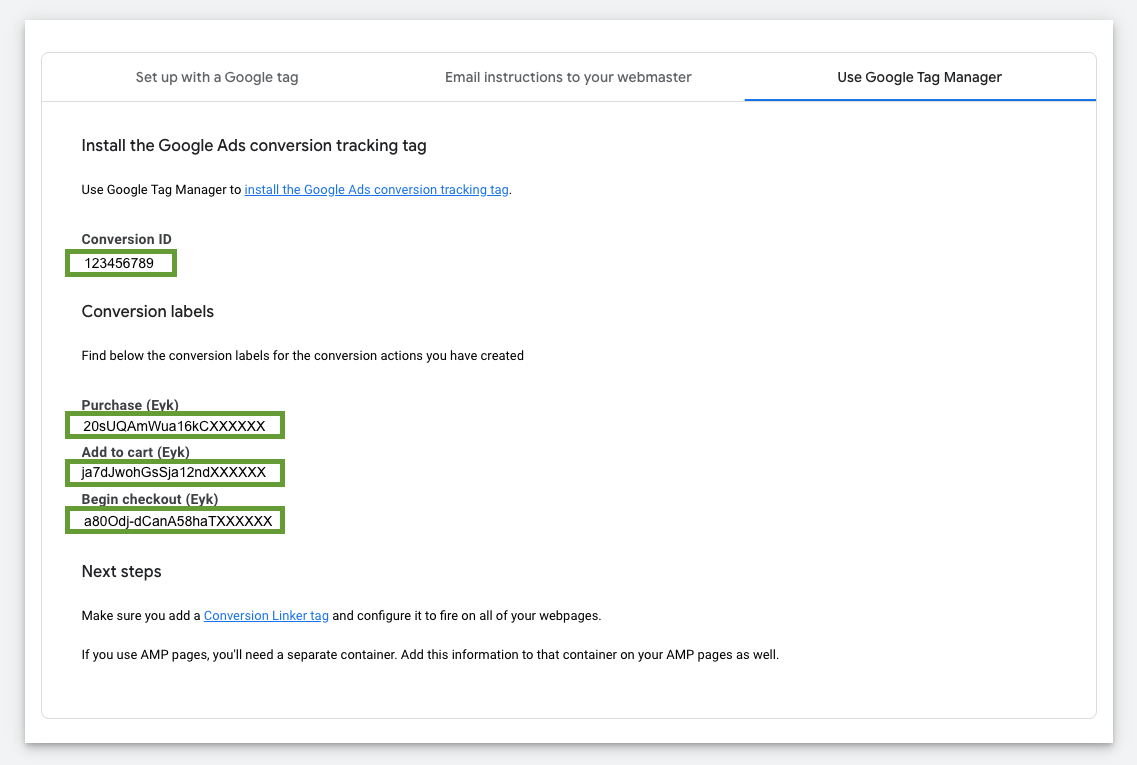
  <Step title="Copy the conversion values">
    Copy the following values — you'll need them in the next steps:

    * Conversion ID
    * Conversion label: Purchase (Eyk)
    * Conversion label: Add to cart (Eyk)
    * Conversion label: Begin checkout (Eyk)
    <Frame>
      <img src="https://mintcdn.com/eyk-data/003HpFVjXCLV8bE-/images/destinations/google-ads/15-copy-conversion-values.png?fit=max&auto=format&n=003HpFVjXCLV8bE-&q=85&s=288a23dd19536099356bbfc35280d47d" alt="Conversion ID and labels" width="1137" height="765" data-path="images/destinations/google-ads/15-copy-conversion-values.png" />
    </Frame>
  </Step>

  <Step title="Finish in Google Ads">
    Click the **Done** button.
  </Step>

  <Step title="Add the destination in Eyk">
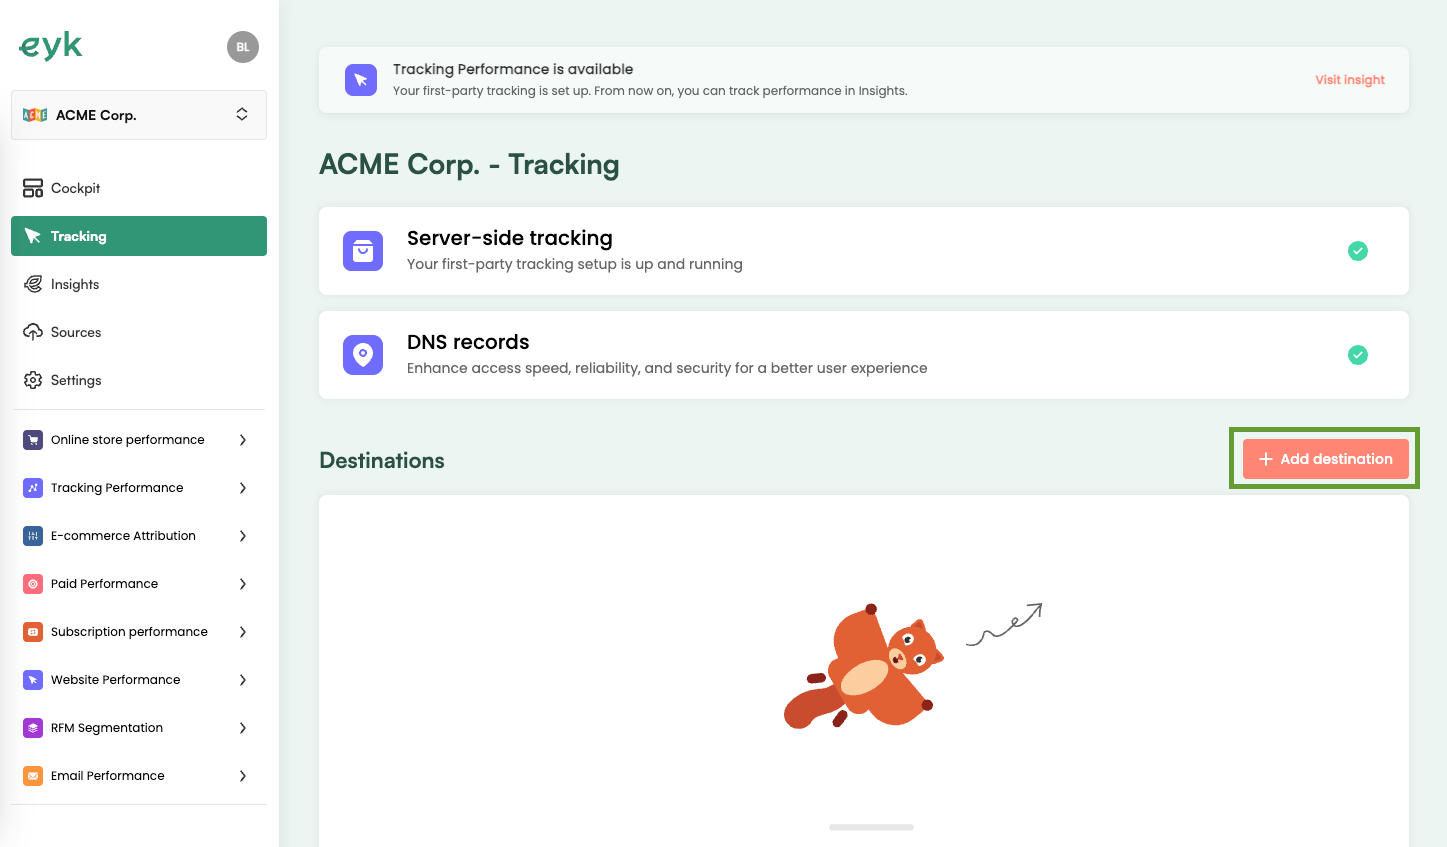
    In your Eyk environment, go to **Tracking** and click the **+ Add destination** button.
    <Frame>
      <img src="https://mintcdn.com/eyk-data/003HpFVjXCLV8bE-/images/destinations/google-ads/16-add-destination-button.png?fit=max&auto=format&n=003HpFVjXCLV8bE-&q=85&s=4c095f19e58a349270f9cc5e8e106079" alt="Add destination button in Eyk" width="1447" height="847" data-path="images/destinations/google-ads/16-add-destination-button.png" />
    </Frame>
  </Step>

  <Step title="Select Google Ads conversion">
    Select **Google Ads conversion** from the list of destinations.
  </Step>

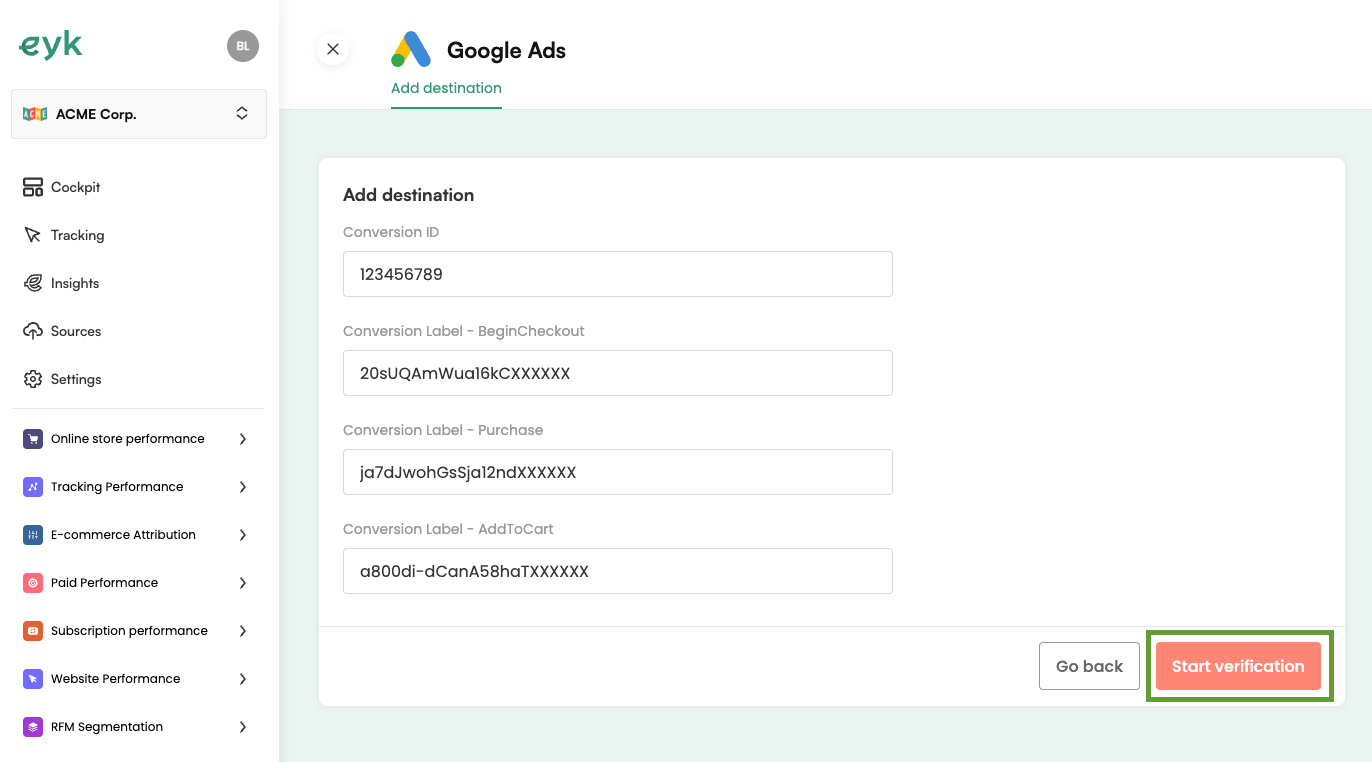
  <Step title="Start verification">
    Enter the fields as collected in the previous steps and click **Start verification**.
    <Frame>
      <img src="https://mintcdn.com/eyk-data/003HpFVjXCLV8bE-/images/destinations/google-ads/17-google-ads-conversion-verification.png?fit=max&auto=format&n=003HpFVjXCLV8bE-&q=85&s=579db20c10e4694096309fd737942caf" alt="Google Ads conversion verification screen" width="1372" height="762" data-path="images/destinations/google-ads/17-google-ads-conversion-verification.png" />
    </Frame>
  </Step>
</Steps>

All done! ✅

<Warning>
  Once you publish this destination, you should pause or remove all existing Google Ads tracking. Leaving these on will lead to duplicate tracking.
</Warning>